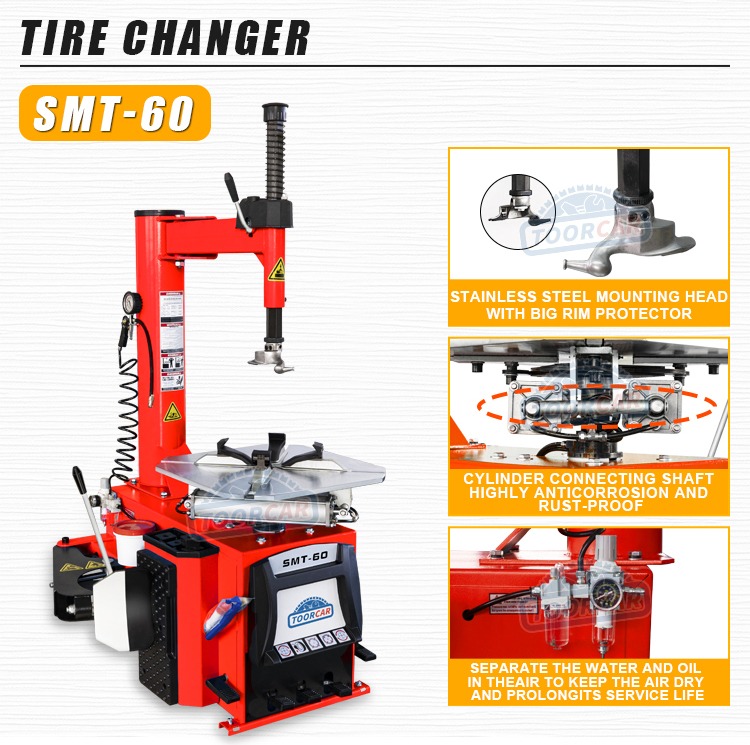
How To Use A Tire Changer
A tire changer is an essential piece of maintenance equipment for 4S shops, auto repair shops, and tire shops. Below is a detailed guide on how to use a tire changer.
Content List:
– Control Method
– Tire Disassembly Method
– Tire Assembly Method
Control Method:
Press the second pedal on the left side of the tire changer and release it when you hear a “click.” Keep the claws stationary. Repeat to move the claw inward and again to move it outward, returning it to the original position. Pull open the flange disconnecting arm and step on the second foot pedal on the right, holding it down. The large cylinder moves the wheel step disconnecting arm inward, separating the tire from the steel ring by the pressure of the flange disconnecting plate on the tire. Release the pedal, and the large cylinder returns to its starting position. Press the first foot pedal to rotate the table clockwise. Conversely, lifting the foot pedal will rotate the table counterclockwise. Turn the locking handle downward to release both the vertical and horizontal axes, or push it upward to lock them simultaneously.
Tire Disassembly Method:
First, deflate the tire you want to remove. Press the flange release plate to separate the tire from the underwire. Place the tire on the work table of the tire changer to hold or clamp it, adjust the position between the dismounting head and the tire, and then lock it in place. Apply lubricant to the tire and rim. Pry the tire edge to the disassembly head with a crowbar, keeping the crowbar in place. Rotate the workbench clockwise to remove the tire. Repeat the same procedure for the other side of the tire. When installing the tire, press the tire edge with the dismantling head and rotate the table clockwise, applying lubricant. Install the other side of the tire similarly. Read the inflating pressure from the inflating meter when inflating the tire.
Tire Assembly Method:
Preparation: Prepare raw materials such as rubber, fabric, and steel for the tire assembly process. Inspect and test these materials to ensure they meet quality standards.
Building the Inner Liner:Apply a rubber compound that provides an airtight barrier to the tire-building drum, forming the base layer for the tire.
Applying the Belts and Ply Layers: Add steel belts and fabric ply layers over the inner liner to provide strength, stability, and flexibility to the tire. The number of ply layers and belts can vary based on the tire’s design and intended use.
Adding Beads and Bead Wire: Insert beads, which are steel wires encased in rubber, to give the tire structure and help it stay seated on the wheel rim. Securely anchor bead wires to the tire edges.
Applying Sidewalls and Tread: Apply sidewalls, which protect the tire’s structure and contain branding information. Then, add the tread, the part of the tire that contacts the road. The tread pattern varies depending on the tire’s intended use (e.g., all-season, winter, performance).
Curing: Place the green tire (assembled but uncured) in a curing mold. Heat and compress the mold to vulcanize the tire and give it its final shape. This process cures the rubber and bonding materials, providing strength and durability.
Quality Control: After curing, perform thorough quality control inspections, checking dimensions, balance, appearance, and other performance factors.
Testing: Some tires undergo additional testing to ensure they meet specific standards, such as load-carrying capacity, speed rating, and tread wear resistance.
Finishing: Label tires with important information such as size, load index, speed rating, and manufacturing date. Apply any necessary cosmetic finishing touches.
Yantai Sunmo Electronic Equipment Co., Ltd.offers excellent products and services. For any needs, please contact us!